THE OCEAN OF OIL
The heroes accidentally dig too deep and break into a massive cavern, plummeting down onto a fungus-choked island in the path of a massive warship. Trapped on the subterranean Ocean of Oil, they are the only thing that could stop a ruthless warlord from taking over the surface world. Can the heroes stop Xokrodir and the crew of the Berg, or are they doomed to perish in the lightless depths?
MAKING A CHARACTER
The heroes begin as indebted, drug-hyped miners, and as such, start with the following equipment instead of the standard package.
2 SUPPLY
Either a 1 WOUND weapon or 1 Armor
3 doses of Amphetamines (a Drug; one dose heals either a STRESS or a WOUND, or grants ADVANTAGE on a roll, but DISADVANTAGE on the immediate next roll made)
A random item
INITIAL ENCOUNTER: The Myconic Isle
The heroes plummet from the ceiling of the massive cavern, landing on a mushroom-laden mass of rock bobbing in the oil.
The island is home to myconids, who are baffled by the arrival of the heroes- they will attack first, ask questions later.
There are 4 myconid priests and 4 myconid warriors in total on the island.
They all know about the Berg’s conquest, its destination, and its captain, and will dispense this information if inquired
In d4 ROUNDS, the Berg will slam into the side of the island, and in another d4 ROUNDS, it will tip over into the oil (the incline of the island impeding movement).
Luckily, a doorway on the side of the Berg is about island level- with a STR roll to clear the gap, perhaps a hero could make the jump!
What room does the doorway lead to? Roll a d4 to find out!
1 Room I, the Engine Room
2 Room IV, the Gelatinous Generator
3 Room VI, Fungal Hydroponics
4 Room IX, the Deck
MYCONID PRIEST N 2 H 4 A Telepathy Spore (emit to speak freely in the minds of all FAR), Holy Fire (roll WIS or take 2 STRESS), Myconic I To survive
MYCONID WARRIOR N 2 H 6 A Telepathy Spore (emit to speak freely in the minds of all FAR), Flintstalk Spear (2 WOUNDS), Myconic I To survive
WHAT IS THE BERG?
ENEMIES ON THE BERG
XOKRODIR
Xokrodir is an undead Mind Flayer with a warped, burned face
He is the Captain of the Berg, and can bring all its traps and tricks to bear
He uses Brain Worms to control his underlings, converting them into Ghouls, strange hybrid Mind Flayer spawn
His greatest weakness is his ego
If he is flattered and appeased, he will be made suggestible.
If he is disrespected, he will grow distracted and erratic.
XOKRODIR N 4 H 10 A Mind Crush (roll INT or take 3 STRESS, or all NEAR roll against 2 STRESS), Telekinesis (Xokrodir can lift and manipulate things at FAR range), Brain Worms (whoever deals killing blow must roll DEX or get a Brain Worm), Brain Eating (spend a TURN eating a fresh brain to get to full health), Egotistic (a display of disrespect grants ADVANTAGE on attack rolls), Undead, Hideous I To conquer and pillage
DR-II-KOR
Dr-ii-kor is a warped myconid, snivelling and subservient to Xokrodir.
He will try and avoid direct confrontation at all costs.
However, his fatal flaw is flattery.
DR-II-KOR N 3 H 8 A Spore Cloud (A cloud appears NEAR Dr-ii-kor and lasts for d4 ROUNDS, roll CHA or be at Dr-ii-kor’s command until you succeed on the roll), Telepathy Spore (emit to speak freely in the minds of all FAR), Rotting Fist (2 WOUNDS), Myconic I To control
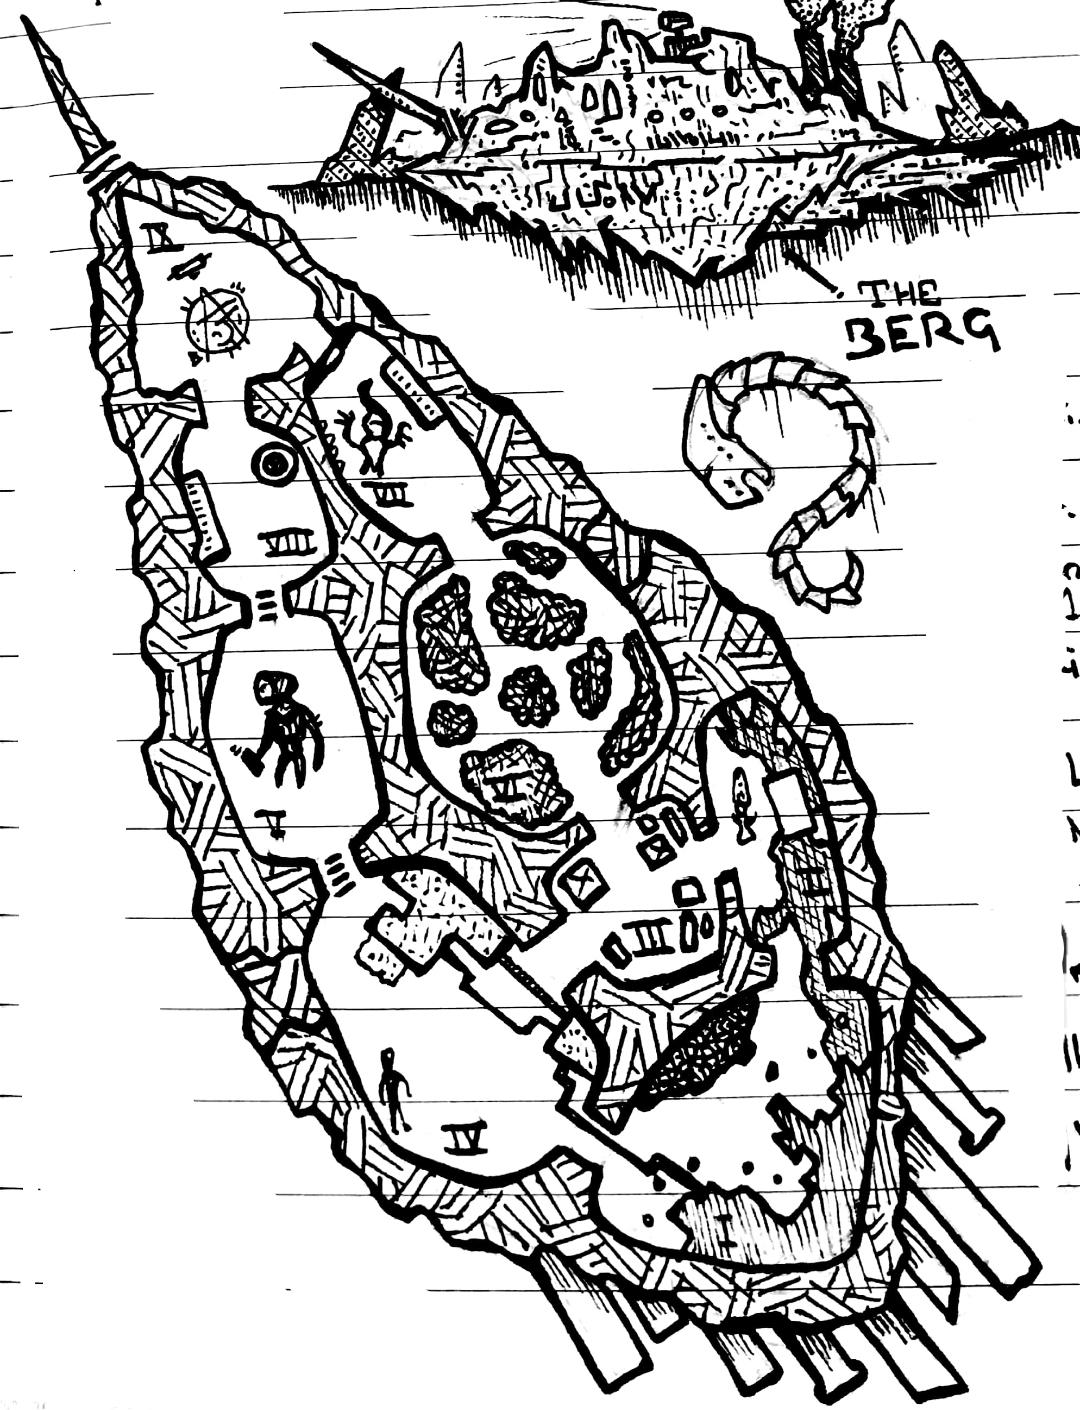
ROOMS OF THE BERG
I THE ENGINE ROOM
If he isn't anywhere else in the Berg, Dr-ii-kor is here overseeing the laborers.
Passages lead away to rooms II and IV.
SPORE LABORERS (8) N 1 H 1 A Myconic Cough (Roll CHA or be infected and at Dr-ii-kor’s command until you succeed on the roll), Rusted Tool (2 WOUNDS), Infected (if Dr-ii-kor is killed or the spores removed, the laborers become lucid and helpful) I To work the machines
II DR-II-KOR'S OFFICE
A battered desk is propped against the stone wall by adhesive mushroom clusters.
On the desk are scraps of notes and an unmarked, sealed clay jar.
The scraps include a map of the Berg.
The scraps also have some of Dr-ii-kor’s notes concerning “the Captain”.
Always remain deferential.
Refer to him as Your Eminence.
Don’t talk about the burns.
The jar is full of Hookwing Pheromones, capable of luring or controlling Hookwings with careful application.
In the corner lies a sleeping Spore Hound, if it awakens, it will attack, summoning Dr-ii-kor in d4 ROUNDS.
Passages in the room continue to rooms I and III.
SPORE HOUND. N 2 H 7 A Tentacles (can attack for 2 WOUNDS NEAR), Mushroom Maw (those wrapped in tentacles take 3 WOUNDS from attacks and must roll CHA or be infected and at Dr-ii-kor’s command until you succeed on the roll) I To serve Dr-ii-kor
III CARGO HOLD
Crates and boxes line the walls of this cramped room.
They all have a small, glowing rune of repelling carved on them, and are locked with rusty padlocks.
If something touches a crate with the rune on it, it must roll STR or be blown back to NEAR range.
In the crates are…
If the crates are disturbed, d4 Dynamite Spiders pour out of a small clockwork box hidden among the crates.
As long as the box is intact, another Dynamite Spider will spawn every ROUND.
The box can be found with a WIS roll.
In d4 ROUNDS, if not indisposed, Dr-ii-kor will enter the room to check on the disturbance.
Halls lead away to rooms II, VI and IV.
DYNAMITE SPIDER N X H 4 A Swarm (N is equal to the number of Dynamite Spiders in FAR range), Mandibles (1 WOUND), Detonate (At any point or upon being destroyed, roll DEX or have all CLOSE take 2 WOUNDS) I To protect the crates
IV THE GELATINOUS GENERATOR
A Ghoul Technician stands overseeing the machine, making sure it keeps functioning.
The ghoul has a Scepter of Assertion.
Any newly generated Gelatinous Cubes will simply begin to devour the nearest source of fresh meat, hero or ghoul alike.
Corridors lead away to rooms III and IV.
GHOUL TECHNICIAN N 3 H 8 A Wrench (2 WOUNDS, fix any damage to the Gelatinous Generator), Brain Worm (whoever deals killing blow must roll DEX or get a Brain Worm) I To keep the machine running
GELATINOUS CUBE N 2 H 10 A Envelop (1 WOUND +1 per turn of successful attack, after the first DEFENSE rolls have DISADVANTAGE), Acid (Every ROUND, destroy a random item from each enveloped, heal 1 for every item destroyed), Weak to Temperature I To grow
V LAMP GOLEM'S LAIR
Winding stairs lead up to this balcony atop the Berg.
A Lamp Golem strange mechanical creature shines light into the darkness, aiding in the Berg’s navigation.
If the Golem is destroyed, it waylays the Berg, slowing its arrival to the Core Isopach by 3 TURNS.
LAMP GOLEM N 3 H 8 A Flashbomb (All in a cone in front roll CON or be blinded until you succeed on the roll), Slam (3 WOUNDS, hot), Armored I To chart the course
VI FUNGAL HYDROPONICS
Massive fungal clusters lie about this high-ceilinged room, letting off strange spores and oozes.
A Spore Hound lies concealed in the fungi.
Passages lead off to rooms III and VII.
SPORE HOUND. N 2 H 7 A Tentacles (can attack for 2 WOUNDS NEAR), Mushroom Maw (those wrapped in tentacles take 3 WOUNDS from attacks and must roll CHA or be infected and at Dr-ii-kor’s command until you succeed on the roll) I To serve Dr-ii-kor
VII THE WRAITH'S DOOR
This room has two rusted iron doors on either side.
.The wall of this room is dominated by a large metal unit with a latch release on the side
Against the opposite wall is a small iron plaque
4 gems sit in shallow indentations, all of which can be easily removed.
A scarlet ruby
A violet amethyst
An indigo sapphire
A yellow quartz
The indentations on the door frame are perfectly gem-sized, and the proper order will make the door unlock.
If the plaque is peeled back, behind it, in a shallow alcove, is a Replicator
When the heroes touch something in the room, a Ghoul Wraith rises from the ground and begins to attack.
Passages in the room lead out to rooms VI and IX.
GHOUL WRAITH N 3 H 6 A Spectral Throttle (2 STRESS), Brain Worm (whoever deals killing blow must roll DEX or get a Brain Worm), Incorporeal I To take revenge on the living
VIII DIVING HATCH
The wall of this room is dominated by a large metal unit with a latch release on the side
3 Ghoul Technicians stand ready in dive suits.
A hatch down to the Ocean of Oil lies in a corner of the room.
A random piece of oil-soaked LOOT, the fruits of the most recent dive, lies in the corner.
Corridors lead away to rooms V and IX.
GHOUL TECHNICIAN N 3 H 8 A Rotting Throttle (2 WOUNDS), Brain Worm (whoever deals killing blow must roll DEX or get a Brain Worm), Dive Suit I To keep the machine running
IX THE DECK
This open-air deck looks out onto the Ocean, a visual reminder of just how close the Berg is to the Isoprach
Xokrodir stands at the wheel, standing inside a circle of runes
These are runes of invulnerability
If Xokrodir is tricked or forced off the runes, he will retreat, locking the wheel
XOKRODIR N 4 H 10 A Mind Crush (roll INT or take 3 STRESS, or all NEAR roll against 2 STRESS), Telekinesis (Xokrodir can lift and manipulate things at FAR range), Brain Worms (whoever deals killing blow must roll DEX or get a Brain Worm), Brain Eating (spend a TURN eating a fresh brain to get to full health), Egotistic (a display of disrespect grants ADVANTAGE on attack rolls), Undead, Hideous I To conquer and pillage
RANDOM ENCOUNTERS
As normal, a random encounter occurs every 6 TURNS, and can be negated by spending a point of SUPPLY. Roll a d6 to see what the heroes encounter.
1-3 d4 Hookwings
Hookwings are predatory creatures native to the Ocean of Oil, leathery-winged and crystal-eyed creatures with forearms ending in metal-rending claws. There is a massive nest of them lairing in the Isopach, and a small pack wanders out to investigate the Berg, ripping through the stone walls and attacking. Another Hookwing arrives every d4 ROUNDS until all the Hookwings are indisposed.
4 Collision
The Berg runs up against another island. The floor rocks and shakes for the duration of TURN, and 3 Myconid Warriors wander aboard the ship, fleeing the collapse of their home. Terrified, they’ll intercept the party next TURN.
5 Dr-ii-kor (if dead, 2d4 Ghoul Technicians)
6 Xokrodir (if dead, 2d4 Ghoul Technicians)
HOOKWING N X H 5 A Swarm (N is equal to the number of Hookwings in FAR range), Rending Claw (1 WOUND, destroy a random piece of equipment), Crystal Eye (if surgically removed, acts as NATURAL LOOT that allows you to look through any Hookwing’s eyes with a WIS roll) I To hunt
MYCONID WARRIOR N 2 H 6 A Telepathy Spore (emit to speak freely in the minds of all FAR), Flintstalk Spear (2 WOUNDS), Myconic I To survive
DR-II-KOR N 3 H 8 A Spore Cloud (A cloud appears NEAR Dr-ii-kor and lasts for d4 ROUNDS, roll CHA or be at Dr-ii-kor’s command until you succeed on the roll), Telepathy Spore (emit to speak freely in the minds of all FAR), Rotting Fist (2 WOUNDS), Myconic I To control
XOKRODIR N 4 H 10 A Mind Crush (roll INT or take 3 STRESS, or all NEAR roll against 2 STRESS), Telekinesis (Xokrodir can lift and manipulate things at FAR range), Brain Worms (whoever deals killing blow must roll DEX or get a Brain Worm), Brain Eating (spend a TURN eating a fresh brain to get to full health), Egotistic (a display of disrespect grants ADVANTAGE on attack rolls), Undead, Hideous I To conquer and pillage
GHOUL TECHNICIANS N 3 H 6 A Rotting Throttle (2 WOUNDS), Brain Worm (whoever deals killing blow must roll DEX or get a Brain Worm) I To keep the Berg running
THE CORE ISOPACH
Instead of covering every eventuality and plan the heroes could come up with (which would be impossible), this sequence of ROUNDS describes an ideal version of the ascent as Xokrodir planned it. Anything the heroes interfered with may delay plans by a ROUND, or cause extra complications to be exploited. This is it, the climax of the adventure- can the heroes stop the Berg from conquering their home?
ROUND 1:
The set of electrified hooks from room VII deploy.
Dr-ii-kor ingests the Hookwing pheromone from room II, and begins to emit hypnotic spores from either room V or IX
ROUND 2:
The second set of hooks, from room VIII, deploy.
The Hookwing colony laired in the Isopach are now under Dr-ii-kor’s control, he can spend an action summoning d4 Hookwings that do his bidding
ROUND 3:
ROUND 4:
ROUND 6:
THE END?
Here are some ideas as to how the adventure might conclude itself, though every playthough is different, and you should use your discretion as to customizing the outcome for your playthrough.
The Fall of the Berg. The players kill Xokrodir and stop the Berg from ascending the Isopach. Depending on if the Berg is intact or any outstanding allies and villains yet remain, this can be the great springboard for a campaign where the heroes explore the Ocean of Oil to find a way home!
Xokrodir Fails. If the Berg is stopped from ascending the Isopach, but Xokrodir lives, he grows enraged. He lights a match and tosses it over the edge… it takes a ROUND for it to hit the Ocean, then it all goes up in smoke (see Fuel Holocaust).
An Oily Rebirth. If the heroes are incapacitated over the course of the adventure, Xokrodir orders the Ghouls to toss them overboard. The surviving heroes are resuscitated by a Myconid mage and their apprentices and teleported back onto the Berg with a piece of ARCANE LOOT, 6 TURNS later or just as the Berg begins its ascent into the Isoprach (whichever comes first).
The Berg Ascendant. If the Berg succeeds in scaling the Isopach, the heroes have a steep task ahead of them. The Isopach leads to the sewers under the heart of a Dwarvish metropolis (Erz, if in the Autumn Kingdoms). If Xokrodir is dead, Dr-ii-kor heads the conquest, which, without heroic interference, will be swift and brutal. From there, the Empire of the Berg will spread like fire on oil...
Fuel Holocaust. If, by some foul accident, the Ocean of Oil is lit on fire, it instantly not only destroys the Berg and the entire contents of the Ocean, but collapses the ground of the land above. The world is forever changed, as new passages to the underground ripped open by the explosion vomit forth eyeless, pale horrors...